-
Changes in Version 3.6.2 (2021-01-22)
Changes in Version 3.5.0 (2020-06-04)
Changes in Version 3.4.2 (2020-03-26)
Changes in Version 3.3.1 (2019-08-22)
Changes in Version 3.3.0 (2019-01-09)
Changes in Version 3.2.1 (2018-12-21)
Changes in Version 3.2.0 (2018-08-27)
Changes in Version 3.1.1 (2018-06-29)
Changes in Version 3.1.0 (2018-03-27)
Changes in Version 3.0.0 (2018-02-20)
Running your first tapir Test Case
Setting up the Test Module
The easiest way to get started with tapir is to use the corresponding Maven Archetype. You can do this from the command-line or the Eclipse IDE:
Commandline
mvn archetype:generate -DarchetypeGroupId=io.tapir-test -DarchetypeArtifactId=tapir-extensions-archetype -DarchetypeVersion=1.3.0
Maven will ask you for the following properties:
- groupId: The GroupId of your test project
- artifactId: The ArtifactId of your test project
- version: The version of your test project
- package: The base package of your test project
- moduleName: The name of your test project. The name should start with an upper case letter and shouldn’t contain spaces.
After confirming the properties the new Maven module is generated into a subfolder which is named like your artifactId.
Eclipse
Eclipse provides a project wizard to create Maven projects:
- Select File | New | Other… | Maven | Maven Project and click Next
- Proceed to the location selection by clicking Next > again
- Select Add Archetype… and enter these coordinates:
- Archetype Group Id: io.tapir-test
- Archetype Artifact Id: tapir-extensions-archetype
- Archetype Version: 1.3.0
- Click OK
- Ensure that the archetype is selected and click Next >
- Eclipse asks you to specify the following properties:
- groupId: The GroupId of your test project
- artifactId: The ArtifactId of your test project
- version: The version of your test project
- package: The base package of your test project
- moduleName: The name of your test project. The name should start with an upper case letter and shouldn’t contain spaces.
- After clicking Finish the module is available in your workspace as an Eclipse project.
Writing your First Test
Our first test should test the Wikipedia website. We want to test this workflow:
- Visit Wikipedia website
- Type tapir into the search field
- Press the search button
- Assert that Tapir is contained in the title of the displayed page
First of all we have to create a Page Object. For our first test we pare down the Page Object to the minimum. It only includes elements we need for our test: The search field and the search button.
Create a new Xtend class by choosing File | New | Xtend Class with these properties:
- Source folder: {yourprojectname}/src/main/java
- Package: {yourbasepackage}.page
- Name: WikipediaPage
This is the implementation of our first Page Object. We mark the class as a Page Object by using the @Page annotation. Each UI element is annotated by @SeleniumElement. The UI element is bound to the HTML Page by passing a locator like id =”searchInput”.
package de.bmiag.firsttapirtest.page

import de.bmiag.tapir.page.annotation.Page
import de.bmiag.tapir.htmlbasic.api.TextField
import de.bmiag.tapir.selenium.annotation.SeleniumElement
import de.bmiag.tapir.htmlbasic.api.Button

@Page
class WikipediaPage {

	@SeleniumElement(id = "searchInput")
	TextField searchField

	@SeleniumElement(id = "searchButton")
	Button searchButton
}
Having the Page Object in place we can create our first test class. Create a new Xtend class by choosing File | New | Xtend Class with these properties:
- Source folder: {yourprojectname}/src/test/java
- Package: {yourbasepackage}.test
- Name: WikipediaSearchTest
Our test class exactly reflects the workflow we described above. The test class becomes an executable specification. Every test class is annotated by @TestClass and has steps which are executed sequentially. The WikipediaPage is injected by using Spring @Autowired annotation.
Additonally, we use the BrowerInteractionService which is shipped with tapir in order to have the openURL and title method. Note that BrowerInteractionService is injected as an extension. This is an Xtend feature which means that you can call visible methods of the BrowerInteractionService directly from your test class without need of referencing the field. This syntactic sugar makes your test code much more readable.
package de.bmiag.firsttapirtest.test

import org.springframework.beans.factory.annotation.Autowired
import de.bmiag.tapir.selenium.service.BrowserInteractionService
import de.bmiag.tapir.execution.annotations.step.Step
import de.bmiag.tapir.execution.annotations.testclass.TestClass
import de.bmiag.firsttapirtest.page.WikipediaPage

@TestClass
class WikipediaSearchTest {

	@Autowired
	WikipediaPage wikipediaPage

	@Autowired
	extension BrowserInteractionService

	@Step
	def visitWikipediaWebsite() {
		openURL("https://en.wikipedia.org")
	}

	@Step
	def searchForTapir() {
		wikipediaPage.searchField.text = "tapir"
		wikipediaPage.searchButton.click
		assertThat[title].contains("Tapir")
	}
}
Running your First Test
tapir offers the possibility to launch your test class directly from Eclipse or via the command-line with maven.
Commandline
Switch to the newly created directory and type:
mvn clean integration-test allure:serve
This command builds the module, runs the tapir tests, creates a report and fires up a servlet container in order to visualize the test results in your browser.
Eclipse
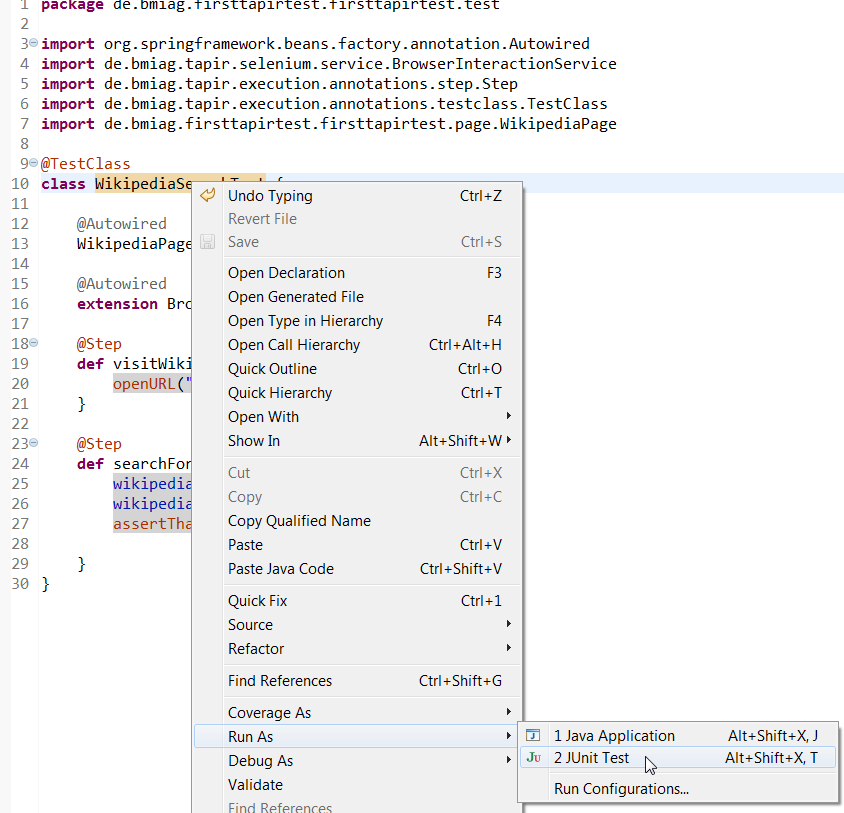
| In order to run your test class from Eclipse just right-click on the test class name and select Run As | JUnit Test as the screenshots illustrates. |
Summary
This chapter demonstrated how easy and fast it is to set up a tapir test module. In the next chapter we focus on the concepts and explain them more detailed.